
Your first impression of practically everything is through sight. The TV shows you watch, the food you eat and, certainly, the beer you drink are all things you decide you want to give a try because you saw something. Even if you get a fantastic word of mouth recommendation the chances are pretty high that you’re going to get online and search for the thing and take a look at it. Your brain just needs to get an idea what something looks like before it can decide if you want it or not.
The last decade of beer has been…interesting. We’ve seen massive growth in the number of breweries operating as well as market shares. We’ve seen those sales plateau and now begin to drop. Breweries are closing at record rates. While all this doom and gloom occurs there are a number of breweries, large and small, that are remaining relevant and even increasing their sales. A lot of this is because of the presentation of their brand through social media, and specifically photos.
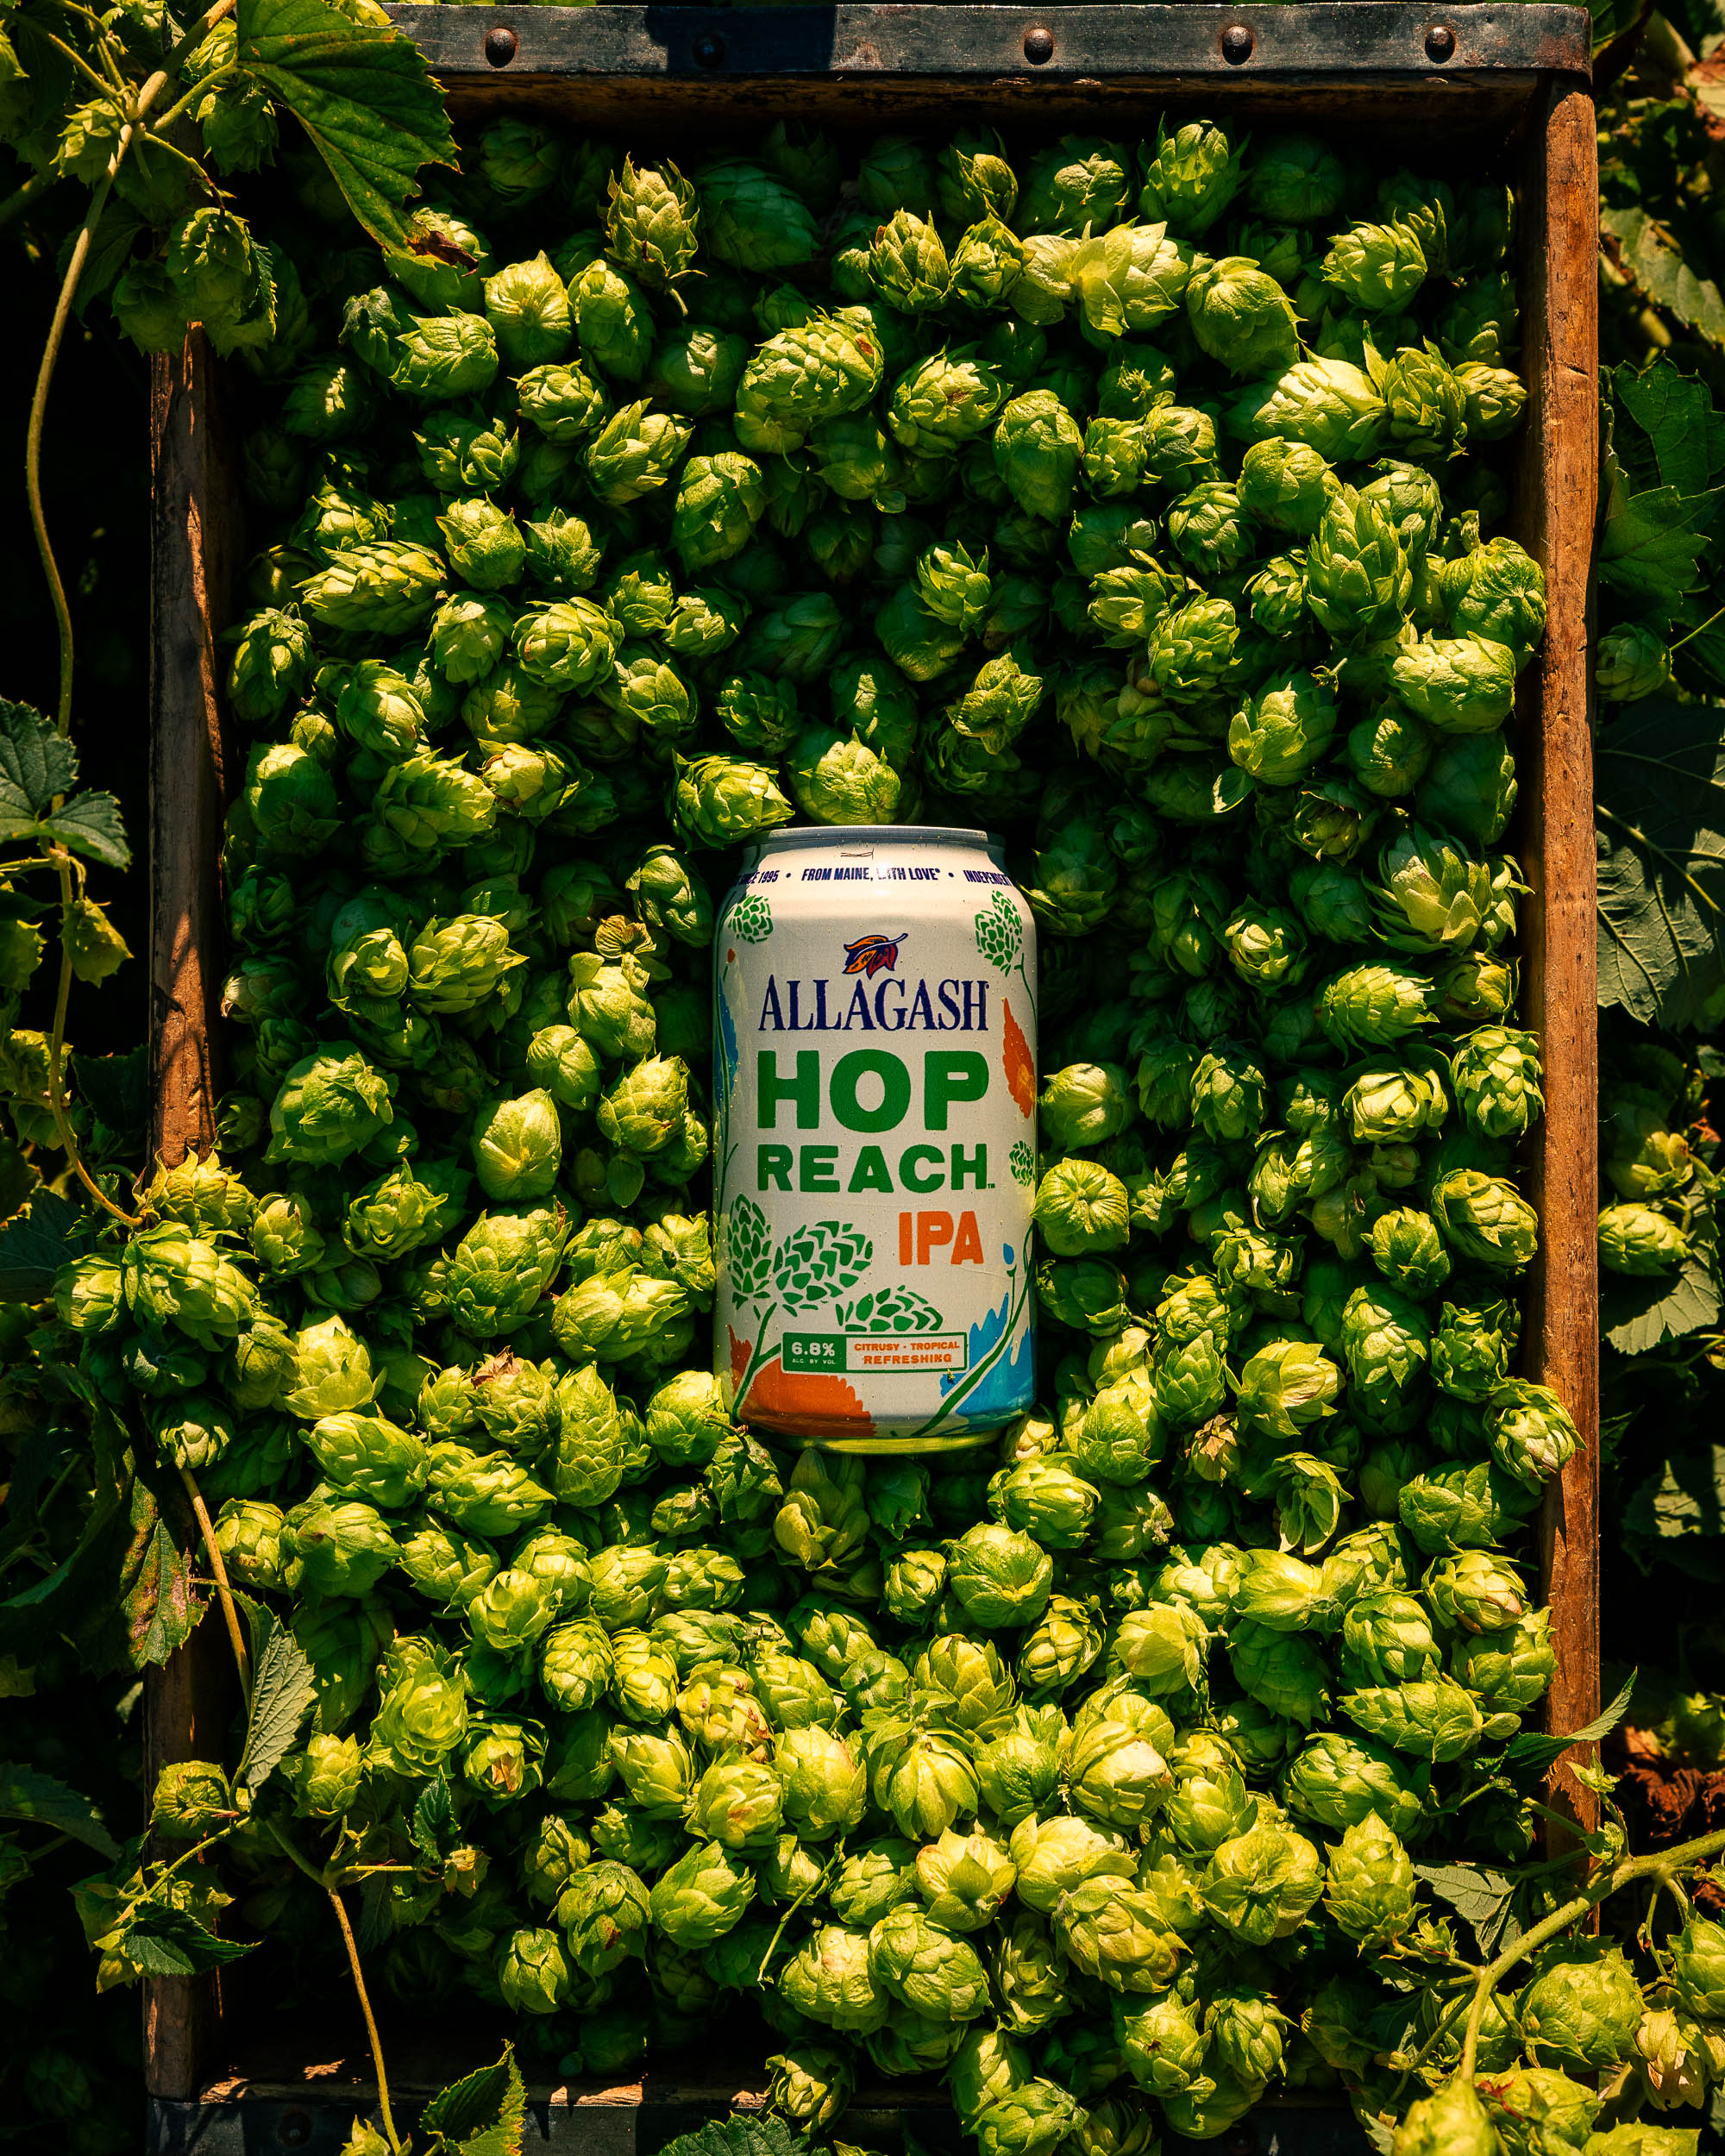
There are a number of larger craft breweries that have amazing, eye catching photography. Allagash, New Belgium, Sierra Nevada and Firestone Walker all jump to my mind almost immediately. Many of them have in house creative staff that handle photography for them. Others hire freelance photographers or utilize marketing firms to take care of this for them. In short, they have the money to get great results. Or, at least, that’s how we have been built to think. Big companies have the money to make nice things.
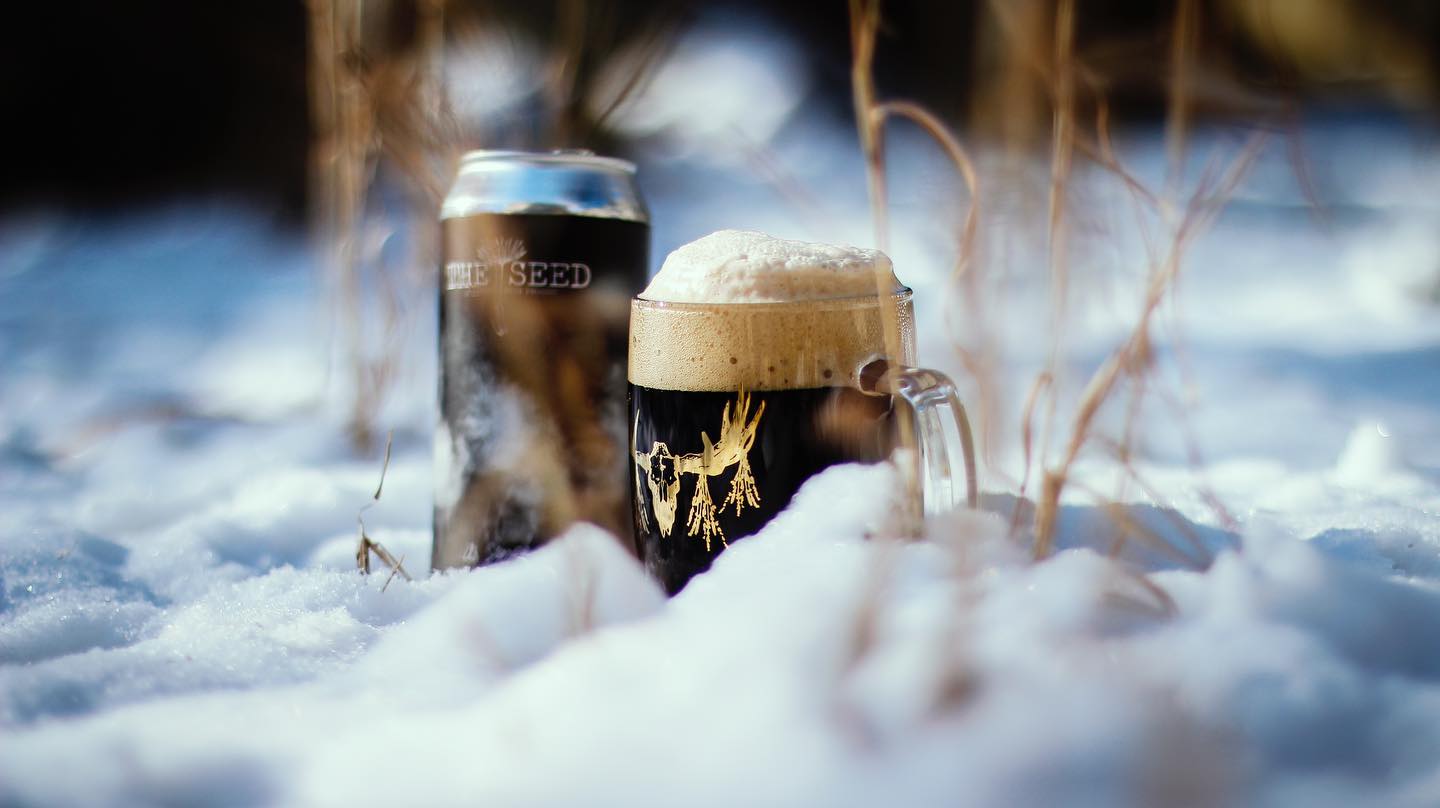
This doesn’t mean that the smaller places are without great presentation of their brands through photography. Forest & Main, Godspeed, The Seed and Calusa all have stunning, exciting photography that presents their brand in the same league as those bigger names. Almost all of those places have a person on staff that handles their photos. Owners, brewers, bartenders and even dedicated sales or marketing people that have an eye and love for still photography have helped invigorate those brands.


Meanwhile there are thousands of other breweries that don’t have these beautiful presentations. For years, many skated by on their beer alone. Maybe you were the only brewery in town or you made such good beer that people came in and became regulars. You didn’t need to worry about all that marketing and social and photo stuff. But things are really different now. Breweries are struggling. You might be looking for a way to standout from the rest of your competition.
Allagash was probably the first brewery that caught my attention as “hey, they are doing amazing photography and it is making me more interested in them.” Allagash wasn’t even distributed anywhere near me but I was hooked. I mean, I knew who they were and knew they made good beer but those shots of their beer and the beauty of Maine we stunning. I don’t know if they created the bar but they certainly grabbed it and moved it very high up into the sky.


I’ve had a curiosity and appreciation for photography for a long time but never really knew what all went into it. I had a digital camera in my early 20s and thought I was taking cool photos of trees, street lights and driveways. I turned them black and white because…reasons? But I didn’t know what I was doing. Allagash made me want to learn more but I didn’t have the money for an expensive camera and lenses and all that. But I did have a phone, even if it wasn’t a great one, and the internet to teach me.
Today I primarily make my living in the beer industry by taking photos of beer. I do other things but I’m not filling kegs, packing pallets of cans or running two cleaning cycles of fermenters while I’m doing it. I’ve learned a lot over the last 5 years or so and felt like I’ve developed some tips, tools and tricks to taking good photos even without top of the line equipment. So, I decided to put this post together to hopefully guide and inspire some people, using a phone camera or even an entry level DSLR, to creating better photos that will make your beer and brand standout a bit more without breaking the bank.
I am not going to be going into camera functionality. You won’t be seeing me telling you what shutter speed, aperture or ISO is. That’s not what we’re here for. There are so many videos out there on YouTube that can explain that and from people way more qualified than me.
I will also not be telling you what kind of shots you should be taking. That’s up to you, it’s your brand and your art. There are few things I hate more than when I’m watching a tutorial video and the person starts talking about what art is and what you should and shouldn’t be trying to communicate to the audience. Fuck that. If I communicate my preferences of things, like lighting and moods, it is solely for example and you shouldn’t take that as meaning you should do that. You do you.
This guide should be taken as exactly that, a guide. Nothing is in stone. You don’t have to do all of these things. You don’t have to do any of them. It’s about what works for you.
Here is something that you do need to do. You need to come into this with an open mind and know that it is going to take work. Remember, you were just taking quick pictures of your beer on your phone and you aren’t excited about those. So, this isn’t going to be doing exactly that but with an app or filters or anything like that. You’re going to do research, practice shots, more practice shots and then real shots. And even after that, you’re going to edit. This guide isn’t about saving you time. If that’s what you’re looking for, you’re in the wrong spot.
Ok, all that is out of the way. Ready to strap in?

Equipment
If we want to be bare bones about this all you really need is a camera (your phone or an actual camera) and your subject but sometimes there are some other things that come in handy.
A tripod can be super helpful for getting a shot. Not only do you not have to worry about resetting your shot if you need to make an adjustment but the lack of movement helps create more crisp and sharp photos. There are so many types of tripods out there, including for phones, but you don’t need anything super heavy duty for most shots around your brewery and taproom. Hell, I’ve even just used chairs and tables along with some coasters tucked under the lens to replace a tripod.
A light can be helpful in some situations. I prefer using natural light for almost all my shots but I do have a little rechargeable light that fits in my pocket for certain occasions. It’s LED and dimmable along with being able to change its color between white and a warmer orange tone. Just try to stay away from really harsh lights. Typical light bulbs you buy for around your house aren’t good for this. Not all light is the same.
If you are going to take a photo of a beer that is a draft only offering I like to have a pitcher handy. After I do my planning, set up and practice shots I will pour the beer right where I am taking the photo from the pitcher. Depending on where in your brewery or taproom you are taking the photo you may be a long way away from your taps. Filling your glass from the tap and then walking to where you are going to shoot could cause spillage or a loss of head. Then you need to go back and refill. The pitcher can have beer ready to pour right on the spot. This can also be used for packaged beer that you don’t want to open up a can or bottle for. Just use your draft version and have your unopened can next to the glass and still be able to sell it later.
A towel is also a good little tool to have in case of spillage. Sometimes people do purposeful overpours to show foam flowing over the side of the glass. You need to clean that shit up so have some towels.
Hear me out on this one. Salt. Salt is a little trick that can help keep head retention going longer on a beer. You put a little salt into your already poured beer. This creates nucleation points in the beer that creates more foam. This will give you some extra time to not rush to taking your photo. Sure, you don’t have a nice test beer to drink afterward but it really does help.
Then all you need is your phone or camera. I’m not going to tell you what kind of those you should have because it’s up to you. One funny thing of note is that some people won’t spend the money on a decent, entry level DSLR camera because they say they are too expensive but will walk around with a camera attached to their phone that is probably more expensive than the camera and isn’t as good of picture quality. Look, I’m not judging you for which you want to use. I’m here to help you get the best out of either. I just think it’s funny when price is the argument.
That’s really all you need to get started. You may find things as you go that will help you like lightboxes, better lighting in general, reflectors, etc. If you want to do more staged shots with backdrops and props you are going to need some more stuff, especially lighting. There are some breweries that do fantastic shots like these. They just aren’t my thing.
Other than that, this stuff should be good enough to get you going.
Find Inspiration
This should be relatively easy and self explanatory. Find some breweries or brands who’s presentation you like. I’m sure you have to have at least one or two. I talked about how Allagash was a big one for me. I asked people on Twitter (not calling it X) a few years back to show me breweries that do great photography and I wasn’t disappointed. There are breweries who I absolutely adore their look and I’ve never even had a drop of their beer touch my tongue!
So, you’ve found a couple brands that you like their photos. Now dig into why you like them. Is there a theme or certain settings? Is there a use of color or tones? I personally love darker tones and high contrast between light and dark. Playing with shadows is also my cup of tea.
Make note of some of these shots. Save a link to them if you need to. You are developing your look and mood. It’s ok if things cross over from different brands. That’s how we all are and how we build our style. A little bit from here and a little from there. We are a little bit of a bunch of different things come together to be ourselves. Influence drives us.
Hell, try recreating some of those shots for practice. We talkin’ about practice. Not a game. You will learn from it and can figure out how to implement those settings later.
As you go you will find your look and will be able to stick to that look for all future shots. You will be making something that is uniquely your brand.
Locations
Okay, so maybe you don’t live near the beautiful landscapes of Maine but I assure you that there are places in your brewery, taproom and immediate area that are perfect for photos. You just have to find them. And finding them is all about the ability to stop ignoring everyday things you see.
We see certain things so many times that we grow numb to them eventually. Being able to start looking at those everyday things again and think “Would this make a good photo.” is key.
Take walks around your space. Walk them at different times of the day. The sun moves throughout the day and will create different looking spaces depending on the location of windows and doors as the day progresses. In our taproom at Copperpoint there are points in the morning and the afternoon that the sun comes through our windows at just the right angle to create these awesome shots of the window frames across some of the booths. I have used these booths so many times.


Take note of the sun. Super clear days at mid day are not usually going to give you the best lighting when used directly. Mornings and late afternoons typically give you the best direct lighting. Indirect light during mid days can result in some really cool shadows and photo ops.
Grab a can of beer or an empty glass (or half full) to take with you on these walks. Do you see something that you think would frame a can or glass perfectly? Put that can or glass down, step back and do that old fashioned framing you do with your hands and fingers. Think that was just something silly you saw in cartoons? It serves it’s purpose exactly how it should.
I like to look for backgrounds that create a path towards my subject (the beer). These are natural cues to the eye to look in that direct towards the subject. There are lots of things naturally in an environment that can do this. A path between rows of fermenters or a long bar top can be perfect.
But don’t get too busy. Too much going on in a background can be distracting to the eye and take away from what you want people to focus on. Doing a photo in your walk-in cooler that has stacks of kegs, pallets of cans and so much other stuff possibly packed into it may take away from your single object you are trying to spotlight.
Don’t get yourself stuck just in your brewery or taproom. You may have some interesting spots a short walk away from your own four walls. Are there some woods down the street? Maybe a body of water like a pond, stream or ocean? Grab your can and glass and see.
I want to think that I shouldn’t have to say this but be mindful of private properties. Do not trespass. Also do not break rules and laws of public places. Don’t be cracking open beers in a park where alcohol is prohibited.
Another potential location could be right under your nose at your own house. Maybe you have a great backyard, garden, home bar or office that would make for a great setting to some photos. Use those to your advantage! Hell, if you have friends or family that have a great looking spot ask them to use it for a bit. You could probably pay them in some of the beer you are taking photos of.
There are so many unassuming places out there. The more you do this exercise of walking around and looking for photo opportunity spots the better you will get and you will find yourself doing it even when it isn’t your primary goal.
Plan and Setup The Shot
You’ve picked out your spot but it’s not exactly time to shoot yet. You are going to want to plan out your shot by placing your subject, be it a glass or package of beer, and line up your shot in camera.
At this point I like to fill up my glass maybe half way with beer. You have no idea how many times I have thought I found a great shot only to fill the glass up and see that the surface that glass is on is crooked. A crooked surface will make the head on your beer look all wonky. An expert could edit this in post to look better but you don’t have the time and or knowledge for that. I don’t even like doing that. It’s better to get the shot how you want than do major editing jobs like that in post. You might also think that most people might not even notice it and that may be true but you are underestimating what our eyes just naturally look for. Our eyes look for patterns and communicate that to our brains as good to go. When I see an even landscape with a subject that is crooked my brain starts going berserk. “Why is it like that?” it tells me. A lot of people’s minds work this way too and see something like that and scroll on by.
Get your lighting, be it natural or artificial, right. Watch out for annoying glares on your subject. Bright, harsh lights can cause glare on your glass or a can pretty easily. If you’re using an artificial light source try repositioning your light or subject. Dim the light if you have that ability. If you are outside this can go back to what I said about time of day. Mid day sunlight on a clear day is a bit harsh. Find shade or areas with indirect light.
Look for other distractions in the frame. Is there a light socket? Is there a person hanging out in the background? Address those so that they aren’t in frame or adjust your lighting so they aren’t very prominent. Some small things can be edited out using Heal tools in your editing software later so you will need to make that call as to what is acceptable and what isn’t.
Next make sure you are framed, in camera, how you want. I personally like to be framed out a little bit further than what I will ultimately end up with as my presented photo. I will then crop in when I’m editing. Sometimes I like the little extra distance and leave it. You can always crop in. You can’t crop out if you take the photo in too close.
Now take a couple practice shots and observe them. How do things look? Is the lighting good? Do you like that distance? Are there stray distractions you didn’t notice before? I once took a photo of a new can release with the can laying on the ground. I took a top down shot of the can but didn’t notice something that shouldn’t have been there. A cigarette butt was just a tad under the can. I missed it completely when setting up the shot and didn’t take practice shots to look at. I was able to edit it out using the Heal tool later on but, again, if you can avoid these things when shooting you are setting yourself up for success.

One last thing, clean your lens. Get a decent microfiber cloth and clean you damn lens, especially if you’re shooting with your phone. That thing spends so much time in your filthy pockets and touching your hands that have oils all over them. Just give them a quick wipe.
Shooting
Here we are. This is the point you’ve all been waiting for right? Let’s hit the shutter and take some photos. I’m going to break this down into 3 different subsections. I’m going to talk about shooting on an iPhone, on an Android phone and with an actual camera. I am assuming that many people that are reading this and wanting to use it as a guide probably are using their phone to take photos. Your phone is always with you and it’s probably what you are currently using to that take photos and make social media posts.
Disclaimer: I am an iPhone user so I have a lot more first hand knowledge of working on that system as opposed to Android phones. Even with Androids that is pretty generic depending on the maker of the actual phone. My only experience on those is with Samsung phones.
iPhone
I’m going to start off by telling you something that might sound completely backwards when it comes to shooting photos on your iPhone but here goes. Don’t shoot with the native camera app. What? Why? How am I supposed to shoot then?
In short the native camera app isn’t great. While you may think that you have so many different controls available to you when taking photos you really don’t. Yes, you can zoom and you can apply filters and, ooooh aahhh, portrait mode! None of that provides real control over exposure of your photos like shutter speed and ISO. Essentially the native camera app is going to pick all these settings for you based on what you are pointing at. Lots of times it can get these settings pretty right but there are others where it can be very wrong. I have found my camera app will overexpose things way more than what I want. This will all depend on the style and look you are going for but just my own experience is that I want more control over my photo settings.
If you are going to go against me on this and use the native camera then just do me one favor? Please please please don’t use portrait mode. You might think that soft background looks great for your selfies but when applied to product shots you will see some harsh lines in that blur that looks terrible. In lots of cases when I’m scrolling on Instagram if I see a photo I don’t like I just keep scrolling. Portrait mode beer shots make me stop and make me get mad. That’s not why you want someone to stop. I see all the terrible edges. I start to judge. It’s like how people went nuts of the Kate Middleton family photo but more so. Just don’t use it.
Ok, so you if you don’t use your camera app what do you use? My easiest recommendation is Adobe Lightroom (Apple and Google Play). This app, as a whole, could be so important to you. You will be able to take photos, with so much more control on settings, and do your editing right in it. Lightroom is free to download and its basic functions are also free. This means you can take photos, organize them, edit them and share them all from the same app. There is a premium version that unlocks some editing tools as well as cloud storage and synching (for if you want to edit on your desktop) but I will get into that when it comes to editing.
The Lightroom camera provides you with so much more control over the exposure of your photos that the native Apple camera app just doesn’t allow. Yeah, it’s not that the camera is incapable of doing this it’s that Apple doesn’t give you the access to it. And I get that many of these settings are foreign to you and I said I’m not going to teach you about these things but trust me when I say that even if you use Auto for a lot of these settings at first that you are going to want to experiment with changing these settings and seeing what you can get. You might as well have them at your disposal right from the start.
I think a great analogy is for brewers that started homebrewing. Did you start with extract? Think of that as the auto settings. Soon you wanted to move into all grain brewing where you are getting more manual and using custom settings. You advance at your own comfort level but realize that you will have a lot more control as you start to do things with more customization.
The great thing about the camera functions in Lightroom is that it really does work a lot like your native camera. You touch the screen to select your focus. Zooming all works the same. There isn’t a whole lot of a learning curve there.
After you take the photo it saves it to your Lightroom folders where you can edit it later. It does not save the photo to your Photos app on your phone until you export it from Lightroom. In the meantime it will be stored on the app and take up space on your phone. This is something to keep in mind with the free version of Lightroom, it’s all stored on your phone in some way. If you sign up for the paid service you will get cloud storage that won’t impact your phone storage until you export to your phone.
If you use the free version and run into issues with storage on your phone you may have to start removing photos from your Lightroom after you export it to save on space. It’s, of course, not ideal if you want to go back to that photo again and make changes but it is really the only option you have outside of buying the premium subscription or buying more iPhone cloud storage space.
Another handy app I used previous to Lightroom is Camera+. This works almost exactly like Lightroom. You can take photos, with more control over exposure, and edit them all in one app. The storage is the same as the free Lightroom, so it can be a space hog if you aren’t careful.

I no longer use this app myself, as I found the Lightroom app better suited for my needs, like going back and forth between desktop and mobile. Choosing between the two might be the matter of your own personal tastes on interface.
Both apps can be hogs on resources of your phone and slow it down if you use it a lot or have an older version of the iPhone. Be sure to force close the app when you are done.
Android
Alright Android users, here we go. I’m about to dive into stuff I don’t know a terrible lot about and am looking forward to someone telling me how wrong I am about their precious interfaces.
A number of years ago I made a decision to switch from iPhone to Samsung. I had friends with them that loved them and they raved all day about how Android systems were better for people that wanted more customization and so on. So I did it and I fucking hated it. It was slow. Its battery was atrocious and would even drain when I had it on the charger using Google Maps. But one thing it had going for it was the camera. The camera was amazing!
I don’t know where the operating systems and batteries (I know some were exploding in pockets at one point) are at today but one thing Samsung continues to excel in with phones are their cameras. Great lens and a native camera app that allows you to change settings to get the shots you want.
On top of Samsung, Sony and Google appear to have pretty respectable cameras under the hood with a good bit of options available to you for setting the shots the way you want to. Sony are considered one of the greats in the general camera field so it shouldn’t be a surprise that their phones have solid cameras on board.
Lightroom is still an option for you with Android as well and it probably isn’t bad to have on your phone anyway for the editing purpose of things. Again, we’ll get to that later.
Out of the box, it just seems like Android users have a slight leg up on shooting compared to their Apple friends.
DSLR/Mirrorless
So if you’re reading this section I am assuming you have done a little bit of photography because you decided to spend some money on a real camera. Awesome!
I won’t get into brands here because this also is mostly a preference thing. I’ve only ever shot with a couple brands of camera and I have my preference. You’ll find yours.
One thing that I would like to talk about when shooting with a camera is your SD card. Probably when you are looking at SD cards you are looking at 2 numbers. The amount of space the card has and how much it costs. You will try to find that perfect point of maximum space (therefore more photos) and price. It’s the whole bang for your buck right? Well there is another number you should look at and that’s your write speed. This is typically given as megabytes per second or MB/s.
If you are going to shoot in RAW format and/or are using a mirrorless camera you are going to need a SD card that can handle large files not just by size but being written to the card quickly. I ran into this issue when I upgraded my camera to a mirrorless from DSLR. Even though I was shooting in RAW format on DSLR the shots on my new camera were so much bigger that the SD card couldn’t write (80 MB/s) these files quick enough. The result was the camera freezing up after a shot and ultimately not writing the photo to the card. It was completely gone. After talking with a friend who is a photographer he let me in on my issue. I dropped some money on a couple cards that wrote at 250 MB/s and haven’t had an issue since them. So do keep that in mind. A cheap SD card may not get you by.
I should also probably mention what RAW means with photos. It is essentially the best quality version of the photo you are taking. It contains way more data that can be manipulated later in editing than a JPG. You can select in your camera’s settings what type of file outputs it makes. I personally have my camera set to do RAW and a high quality JPG. This takes up more space on my camera but I like having the option for when I shoot something that I don’t need a RAW file for and just want the JPG. My cameras were all set to JPG by default. Just check your manual and then settings to find out about yours.
All of this will probably not be something you worry about right now but further down the line if you really want to get better quality photos after editing you will want to shoot in RAW. Just some food for thought and something that can save you space on your SD card.
When you are getting started with a fully functional camera you are probably going to put your settings on AUTO to start. This is completely understandable. You are letting the camera determine what it thinks is the best shutter speed, aperture and ISO for your shot. These can result in some decent shots but just like your iPhone just picking these settings for you there is so much more you can do when getting out of AUTO.
Try experimenting with the Manual settings. You can even try some of the other settings like Aperture Priority or Shutter Priority. These settings will allow you to change the Aperture or Shutter Speed and then the camera selects all the others for you to try to create a well exposed shot. These settings are a great way to learn how those settings work. I did a lot of my early manual shooting in Aperture Priority as I tried to understand it better. I spent some time with Shutter Priority too to get better at freezing a frame right where I want it. Yes, it takes time, time you might not have, but you will be proud of the shots you take as you learn more about these settings.
When working with a real camera you are going to want to be aware of movement. If you are using a tripod, or a makeshift one, you don’t have to worry too much about this because you are keeping your camera steady. But if you are shooting handheld and your camera’s AUTO settings select a low shutter speed your movements while shooting are going to impact the quality of your shot. Having a good base for your feet is important. You will also want to tuck your arms in towards your body. This prevents them from moving too much if you just have your elbows pointed out, away from your body. It takes some conscience effort and practice.
Editing
Editing your photos is going to be something of personal taste. If you like the way your shot looks right out of camera then go with it! A lot of photographers strive for this. But maybe things are a bit too dark or a little too light for your liking. There is software that can help you with all of this!
I’ve previously mentioned Adobe Lightroom in this guide and alluded to its ability to be an all in one app for taking photos and editing them. Well, here’s the editing part of it. The app is available for your phone (Apple and Android) as well as for your desktops (PC and Mac). Again, the free version allows you access to most of the editing tools and it will store a copy of the photo within the app using your phone or computer’s storage. Now here is where we can talk about the premium version of Lightroom.
Lightroom is available with 1TB of cloud storage for $9.99/month. This cloud storage will save you space on your device but also allow you to sync across platforms. Say you start working on the photo on your phone but want to use a desktop to do further editing. You can do that with the paid version. It works vice versa as well.
There is also a Photography package that Adobe offers where you can get both Lightroom and Photoshop for $19.99/month. You probably don’t need Photoshop right now but it is something to consider for the future. Also if you just happen to have a subscription to Photoshop already you could change to the Photography package, get Lightroom and save money. Photoshop by itself is $22.99/month so you do the math.
You can see all the different Adobe plan prices here.
If you don’t want to pay for a service and want to only use your phone for editing photos there is a great option in Snapseed (Apple and Google Play). Snapseed is owned by Google and completely free. Before I decided to go full on into camera use and buy Lightroom this was my go-to. I would use my phone to take photos and Snapseed to edit. It really is a nifty tool for those that just want the bare bones of editing photos for free.
I’m, again, not going to get into the how-tos of editing your photos. There is a wealth of information and videos out there to show you about all these sliders but here are some editing tips.
Crop your photo first. Some people like to do this later but I like to start with it. Chances are that things aren’t perfect in your shot. Maybe your subject isn’t framed how you like or maybe it’s not level. You can correct a lot of this in the crop settings. Maybe it’s just me being neurotic but it would drive me mad to start editing other aspects of a photo while it’s not straight and cropped properly. Also remember how I mentioned setting up your shot a little further out from what you will be looking for? This is where that pays off. You can set your crop in a little bit now to get that ideal framing. Who knows, maybe after you are done editing you think it might look better scaled back again. Do it. You have that power.
There are a lot of sliders but I would concentrate on the Light section for the most part. Get extreme with those sliders to see what they do. Move (slowly) all the way to the right and then all the way to the left. Notice what it’s doing to the photo so you can see what looks right and what doesn’t. What makes it look better and what makes it worse.
You can move into the other sections (Color, Effects and Detail) later. Color might be helpful now depending on what you are going for. At least the Temperature, Vibrance and Saturation sliders are pretty self explanatory.
You are also going to go back to settings. Once you adjust the exposure you aren’t done with it. As you adjust other sliders you will see that you are going to go back to others and make minor adjustments. So don’t just set one and forget about it. You will always be going back and forth.
For a little peek into my flow, I like to underexpose my photos when I’m shooting. Therefore I will make things a little darker than I ultimately will present. Then when I’m editing in Lightroom I will bring up the exposure there to create the ideal look that I want. I’m also very into shadows so I will play with the shadows in Lightroom as well. Just a little idea of what I do but it’s all up to you.
Like I said at the top of this section, you may like what you have right out of the camera and want to go with that. If you are happy with that then go for it! You might still want to make some cropping adjustments just to level out and frame you photo but, by all means, if you don’t want to edit don’t edit.
In the End
Ultimately a lot about photography is subjective and your brand is being built around a subjective ethos that you made for the company. There are certainly some things that are objective. Really poorly lit shots (both under and over exposed) along with horribly out of focus or framed shots are things I think we can all agree are objectively bad and not something that you can subjectively claim to be part of your art. I mean, I guess you can claim that. If you do, ok, you do you.
Like I said very early on in this guide, I’m not going to try to tell you what your photos should look like. I’m not a gatekeeper to photography and art. I’m also not an authority. I’m just someone that really enjoys photography and beer and wants to help people through sharing stuff I’ve learned. I want more people to enjoy this artform that I love so much. I personally think that it, like beer, has a lot of bad faith actors that make things a little less fun for those of us that are looking to learn and have fun with a craft. You were new at one point and learned from others so don’t be a dick to people who are trying to learn as well.
I hope in this whole wall of words that you get something out of it. Even if it just makes you think about planning and framing your shots a little better I would consider this guide a success.
If you have any questions or think there is something I’m missing please reach out to me through the contact form or on Instagram or Twitter. I would love to talk to you. The beer world has always been fun because of people that are open books and willing to share information. While the amount of photographers that I know is considerably smaller than beer people the ones I have reached to and talked with in the past have been just as open and welcoming. I want to continue that trend and be that because I could maybe learn something from you too. Sharing is awesome.
Now go shoot some photos of beers.


No Comments